本文首发于先知社区:https://xz.aliyun.com/t/12683
介绍
现在是 2020 年 1 月,每年的这个时候我都会尝试为自己设定目标。我刚刚和家人在法国度过圣诞节回来,感觉精神焕发。对我来说,思考和计划未来一年总是令人兴奋的时刻;谁知道也许这一年我会擅长我认为的计算机(剧透警告:事实并非如此)。
我心中一直想开发自己的自定义 fuzzer。这是一个完美的机会,可以尝试使用诸如 Windows Hypervisor 平台 API、KVM API 等技术,同时还可以尝试最近版本的 C++。在与 yrp604 交谈后,他说服我编写一个可用于 fuzzing 任何 Windows 目标(用户或内核、应用程序或服务、内核或驱动程序)的工具。他在这个领域做过一些工作,所以当我遇到问题时他可以跟着我并帮助我解决问题。
很好,我的计划是开发这个基于 Windows 快照的 fuzzer,它可以将目标代码运行在虚拟机或仿真器环境中。它允许用户通过断点来注入他们想要的目标,并提供现代 fuzzer 所期望的基本功能:代码覆盖率、崩溃检测、通用变异器、跨平台支持、快速还原等。
编写工具很酷,但编写有用的工具更酷。这就是为什么我需要想出一个可以在开发时测试 fuzzer 的目标。我认为 IDA 会成为一个不错的目标,原因有几个:
- 它是一个复杂的 Windows 用户模式应用程序;
- 它解析一堆二进制文件;
- 它很庞大,启动速度慢。快照方法可以比传统方法更快地 fuzzing;
- 它有漏洞赏金计划。
在这篇博客文章中,我将向你介绍 what the fuzz 的起源、历史以及我从零开始实现初步目标的整个过程。对于那些想要在阅读之前先了解结果的人,你可以在这个 Github 仓库中找到我的研究结果:fuzzing-ida75。
此外,我的好友 Markus 在 RET2 Systems 的博客上撰写了一篇优秀的博客文章,记录了他如何使用 wtf 在一个 3A 游戏中发现可利用的内存损坏:使用基于快照的 fuzzer 测试现代 UDP 游戏协议。
目录
架构
此时我已经非常清楚最终产品会是什么样子以及用户将如何使用 wtf:
- 用户在目标中找到一个靠近攻击者控制数据的位置。使用 Windows 内核调试器在此位置中断并使目标进入需要的状态。完成后用户会生成一个内核崩溃转储并提取 CPU 状态。
- 用户编写一个模块,告诉 wtf 如何向目标中插入测试用例。wtf 提供了基本的功能,如读取物理内存和虚拟内存范围、读写寄存器等。用户还可以定义退出条件,告诉 fuzzer 何时停止执行测试用例。
- wtf 运行目标代码,跟踪代码覆盖率,检查崩溃并跟踪脏内存。
- wtf 从内核崩溃转储中恢复脏物理内存并重置 CPU 状态。它生成一个新的测试用例,循环往复。
在制定计划后,我意识到我没有解析 Windows 内核崩溃转储的代码,这对于 wtf 来说是必不可少的。因此,我编写了 kdmp-parser,这是一个解析 Windows 内核崩溃转储的 C++ 库。我自己实现了它,因为我找不到一个简单易用的库。仅仅获取物理内存是不够的,因为我还需要转储 CPU 状态以及 MSR 等等。幸运的是,yrp604 已经编写了一个 Windbg Javascript 扩展来完成这项工作,所以我重复使用了它的 bdump.js。
一旦我能够提取物理内存和 CPU 状态,我需要一个执行环境来运行我的目标程序。同样,yrp604 当时正在开发 bochscpu,所以我从那里开始。bochscpu 基本上是 bochs 的CPU,可以从带有 C 绑定的 Rust 库中获得(是的,他很好心地做了绑定,因为我不想碰 Rust)。它基本上是一个软件 CPU,知道如何运行 Intel 64 位代码,知道分段、特权级、MSR 等等。它还没有使用任何 bochs 设备,因此更加轻量级。从一开始,我就决定 wtf 不会处理任何设备:没有磁盘、没有屏幕、没有鼠标、没有键盘等等。
Bochscpu 101
第一步是加载物理内存并配置执行环境的 CPU。在 Bochs CPU 中,内存是延迟加载的:在开始执行时没有可用的物理内存,Bochs 会调用回调函数来告诉何时访问了尚未映射的物理内存。这非常好,因为:
- 不需要在模拟器启动时加载整个内存转储文件,
- 仅使用的内存会被映射,使实例在内存使用方面非常轻量级。
我还需要介绍一些常用的缩写:
- GPA:客户机物理地址(Guest physical address)。这是在客户机内部的物理地址。客户机是在模拟器内运行的。
- GVA:客户机虚拟地址(Guest virtual address)。这是客户机的虚拟内存。
- HVA:宿主机虚拟地址(Host virtual address)。这是宿主机内的虚拟内存。宿主机是运行执行环境的系统。
要注册回调函数,用户需要调用 bochscpu_mem_missing_page 函数。回调函数接收正在访问的 GPA,用户可以调用 bochscpu_mem_page_insert 函数将一个 HVA 页面插入环境中,用作 GPA 的备份。是的,所有客户机物理内存都由主机分配的常规虚拟内存进行备份支持。这是 wtf 回调函数的一个简单示例:
void StaticGpaMissingHandler(const uint64_t Gpa) {
  const Gpa_t AlignedGpa = Gpa_t(Gpa).Align();
  BochsHooksDebugPrint("GpaMissingHandler: Mapping GPA {:#x} ({:#x}) ..\n",
                       AlignedGpa, Gpa);

  const void *DmpPage =
      reinterpret_cast<BochscpuBackend_t *>(g_Backend)->GetPhysicalPage(
          AlignedGpa);
  if (DmpPage == nullptr) {
    BochsHooksDebugPrint(
        "GpaMissingHandler: GPA {:#x} is not mapped in the dump.\n",
        AlignedGpa);
  }

  uint8_t *Page = (uint8_t *)aligned_alloc(Page::Size, Page::Size);
  if (Page == nullptr) {
    fmt::print("Failed to allocate memory in GpaMissingHandler.\n");
    __debugbreak();
  }

  if (DmpPage) {

    //
    // Copy the dump page into the new page.
    //

    memcpy(Page, DmpPage, Page::Size);

  } else {

    //
    // Fake it 'till you make it.
    //

    memset(Page, 0, Page::Size);
  }

  //
  // Tell bochscpu that we inserted a page backing the requested GPA.
  //

  bochscpu_mem_page_insert(AlignedGpa.U64(), Page);
}
这很简单:
- 我们使用
aligned_alloc来分配一页内存,因为 Bochs 需要页面对齐的内存, - 我们使用转储数据填充其内容,
- 如果客户机访问不在转储文件中的物理内存,我们假设这意味着操作系统正在分配“新”内存。我们用零填充这些页面。我们还假设如果我们错了,客户机将以惊人的方式崩溃。
要创建上下文,你需要调用 bochscpu_cpu_new 函数创建虚拟 CPU,然后调用 bochscpu_cpu_set_state 函数来设置其状态。这是 LoadState 的简化版本:
void BochscpuBackend_t::LoadState(const CpuState_t &State) {
  bochscpu_cpu_state_t Bochs;
  memset(&Bochs, 0, sizeof(Bochs));

  Seed_ = State.Seed;
  Bochs.bochscpu_seed = State.Seed;
  Bochs.rax = State.Rax;
  Bochs.rbx = State.Rbx;
//...
  Bochs.rflags = State.Rflags;
  Bochs.tsc = State.Tsc;
  Bochs.apic_base = State.ApicBase;
  Bochs.sysenter_cs = State.SysenterCs;
  Bochs.sysenter_esp = State.SysenterEsp;
  Bochs.sysenter_eip = State.SysenterEip;
  Bochs.pat = State.Pat;
  Bochs.efer = uint32_t(State.Efer.Flags);
  Bochs.star = State.Star;
  Bochs.lstar = State.Lstar;
  Bochs.cstar = State.Cstar;
  Bochs.sfmask = State.Sfmask;
  Bochs.kernel_gs_base = State.KernelGsBase;
  Bochs.tsc_aux = State.TscAux;
  Bochs.fpcw = State.Fpcw;
  Bochs.fpsw = State.Fpsw;
  Bochs.fptw = State.Fptw;
  Bochs.cr0 = uint32_t(State.Cr0.Flags);
  Bochs.cr2 = State.Cr2;
  Bochs.cr3 = State.Cr3;
  Bochs.cr4 = uint32_t(State.Cr4.Flags);
  Bochs.cr8 = State.Cr8;
  Bochs.xcr0 = State.Xcr0;
  Bochs.dr0 = State.Dr0;
  Bochs.dr1 = State.Dr1;
  Bochs.dr2 = State.Dr2;
  Bochs.dr3 = State.Dr3;
  Bochs.dr6 = State.Dr6;
  Bochs.dr7 = State.Dr7;
  Bochs.mxcsr = State.Mxcsr;
  Bochs.mxcsr_mask = State.MxcsrMask;
  Bochs.fpop = State.Fpop;

#define SEG(_Bochs_, _Whv_)                                                    \
  {                                                                            \
    Bochs._Bochs_.attr = State._Whv_.Attr;                                     \
    Bochs._Bochs_.base = State._Whv_.Base;                                     \
    Bochs._Bochs_.limit = State._Whv_.Limit;                                   \
    Bochs._Bochs_.present = State._Whv_.Present;                               \
    Bochs._Bochs_.selector = State._Whv_.Selector;                             \
  }

  SEG(es, Es);
  SEG(cs, Cs);
  SEG(ss, Ss);
  SEG(ds, Ds);
  SEG(fs, Fs);
  SEG(gs, Gs);
  SEG(tr, Tr);
  SEG(ldtr, Ldtr);

#undef SEG

#define GLOBALSEG(_Bochs_, _Whv_)                                              \
  {                                                                            \
    Bochs._Bochs_.base = State._Whv_.Base;                                     \
    Bochs._Bochs_.limit = State._Whv_.Limit;                                   \
  }

  GLOBALSEG(gdtr, Gdtr);
  GLOBALSEG(idtr, Idtr);

  // ...
  bochscpu_cpu_set_state(Cpu_, &Bochs);
}
为了注册不同的钩子,用户需要一连串 bochscpu_hooks_t 结构。例如,wtf 是这样注册的:
//
// Prepare the hooks.
//

Hooks_.ctx = this;
Hooks_.after_execution = StaticAfterExecutionHook;
Hooks_.before_execution = StaticBeforeExecutionHook;
Hooks_.lin_access = StaticLinAccessHook;
Hooks_.interrupt = StaticInterruptHook;
Hooks_.exception = StaticExceptionHook;
Hooks_.phy_access = StaticPhyAccessHook;
Hooks_.tlb_cntrl = StaticTlbControlHook;
我不想描述每个钩子,但是我们会在每次执行指令和每次访问物理或虚拟内存时收到通知。如果你感兴趣,可以在 instrumentation.txt 中找到这些 hook 的文档。作为示例,这是提供完整系统代码覆盖率的机制:
void BochscpuBackend_t::BeforeExecutionHook(
        /*void *Context, */ uint32_t, void *) {

  //
  // Grab the rip register off the cpu.
  //

  const Gva_t Rip = Gva_t(bochscpu_cpu_rip(Cpu_));

  //
  // Keep track of new code coverage or log into the trace file.
  //

  const auto &Res = AggregatedCodeCoverage_.emplace(Rip);
  if (Res.second) {
    LastNewCoverage_.emplace(Rip);
  }

  // ...
}
一旦钩子链被配置好,用户就可以用 bochscpu_cpu_run 执行客户虚拟机:
//
// Lift off.
//

bochscpu_cpu_run(Cpu_, HookChain_);
好,我们现在是专家了,可以运行一些代码了!
构建基础
在这一部分中,我重点介绍了我们需要开发的各种基本模块,以使 fuzzer 能够工作并发挥作用。
内存访问设施
如介绍中所述,用户需要告诉 fuzzer 如何将测试用例插入其目标。因此,用户需要能够读写物理内存和虚拟内存。
首先讲一下简单的。要写入客户机物理内存,我们需要找到支持的 HVA 页。bochscpu 使用字典将 GPA 映射到 HVA 页,我们可以使用 bochscpu_mem_phy_translate 进行查询。请记住,两个相邻的 GPA 页在主机地址空间中不一定相邻,这就是为什么跨两个页的写操作需要额外小心。
写虚拟内存更加棘手,因为我们需要知道支持的 GPA。这意味着需要模拟 MMU 并解析页表,这样我们就可以获得 GPA,并知道如何写入这个空间。与上面一样,跨两个页的写操作需要额外小心。
插桩执行流
能够对目标进行插桩非常重要,因为用户和 wtf 本身都需要这个功能来实现各种功能。比如,wtf 使用位于关键区域的断点实现崩溃检测。再比如,用户可能还需要跳过一个函数调用并伪造一个返回值。在模拟器中实现断点很容易,因为我们会在执行指令时收到通知。这是检查是否在此地址注册了断点并在需要时调用回调函数的完美时机:
void BochscpuBackend_t::BeforeExecutionHook(
        /*void *Context, */ uint32_t, void *) {

  //
  // Grab the rip register off the cpu.
  //

  const Gva_t Rip = Gva_t(bochscpu_cpu_rip(Cpu_));

  // ...

  //
  // Handle breakpoints.
  //

  if (Breakpoints_.contains(Rip)) {
    Breakpoints_.at(Rip)(this);
  }
}
处理无限循环
为了避免 fuzzer 进入死循环,AfterExecutionHook 钩子用于对指令进行计数。这会限制测试用例的执行:
void BochscpuBackend_t::AfterExecutionHook(/*void *Context, */ uint32_t,
                                           void *) {

  //
  // Keep track of the instructions executed.
  //

  RunStats_.NumberInstructionsExecuted++;

  //
  // Check the instruction limit.
  //

  if (InstructionLimit_ > 0 &&
      RunStats_.NumberInstructionsExecuted > InstructionLimit_) {

    //
    // If we're over the limit, we stop the cpu.
    //

    BochsHooksDebugPrint("Over the instruction limit ({}), stopping cpu.\n",
                         InstructionLimit_);
    TestcaseResult_ = Timedout_t();
    bochscpu_cpu_stop(Cpu_);
  }
}
跟踪代码覆盖率
同样,由于钩子的存在,用 bochscpu 获得完整的系统代码覆盖率是非常容易的。每当一条指令被执行时,我们就把地址添加到一个集合中:
void BochscpuBackend_t::BeforeExecutionHook(
        /*void *Context, */ uint32_t, void *) {

  //
  // Grab the rip register off the cpu.
  //

  const Gva_t Rip = Gva_t(bochscpu_cpu_rip(Cpu_));

  //
  // Keep track of new code coverage or log into the trace file.
  //

  const auto &Res = AggregatedCodeCoverage_.emplace(Rip);
  if (Res.second) {
    LastNewCoverage_.emplace(Rip);
  }
跟踪脏内存
为了能够快速恢复状态,wtf 跟踪脏内存。不是恢复整个物理内存,而是只恢复自执行开始以来发生变化的内存。其中一个钩子点会在客户机访问内存时通知我们,因此很容易知道哪些内存被写入。
void BochscpuBackend_t::LinAccessHook(/*void *Context, */ uint32_t,
                                      uint64_t VirtualAddress,
                                      uint64_t PhysicalAddress, uintptr_t Len,
                                      uint32_t, uint32_t MemAccess) {

  // ...

  //
  // If this is not a write access, we don't care to go further.
  //

  if (MemAccess != BOCHSCPU_HOOK_MEM_WRITE &&
      MemAccess != BOCHSCPU_HOOK_MEM_RW) {
    return;
  }

  //
  // Adding the physical address the set of dirty GPAs.
  // We don't use DirtyVirtualMemoryRange here as we need to
  // do a GVA->GPA translation which is a bit costly.
  //

  DirtyGpa(Gpa_t(PhysicalAddress));
}
请注意,跨页的访问不会在这个回调函数中处理,因为 bochs 会为每个页提供一个回调。一旦 wtf 知道哪些页是脏页,恢复就很容易了:
bool BochscpuBackend_t::Restore(const CpuState_t &CpuState) {
  // ...
  //
  // Restore physical memory.
  //

  uint8_t ZeroPage[Page::Size];
  memset(ZeroPage, 0, sizeof(ZeroPage));
  for (const auto DirtyGpa : DirtyGpas_) {
    const uint8_t *Hva = DmpParser_.GetPhysicalPage(DirtyGpa.U64());

    //
    // As we allocate physical memory pages full of zeros when
    // the guest tries to access a GPA that isn't present in the dump,
    // we need to be able to restore those. It's easy, if the Hva is nullptr,
    // we point it to a zero page.
    //

    if (Hva == nullptr) {
      Hva = ZeroPage;
    }

    bochscpu_mem_phy_write(DirtyGpa.U64(), Hva, Page::Size);
  }

  //
  // Empty the set.
  //

  DirtyGpas_.clear();

  // ...
  return true;
}
通用变异器
我认为通用变异器很棒,但我不想花太多时间去编写它们。最终,我认为编写一个特定领域的生成器并构建一个多样化且高质量的语料库会带来更大的价值。因此,我干脆抄袭了 libfuzzer 和 honggfuzz 的方法。
class LibfuzzerMutator_t {
  using CustomMutatorFunc_t =
      decltype(fuzzer::ExternalFunctions::LLVMFuzzerCustomMutator);
  fuzzer::Random Rand_;
  fuzzer::MutationDispatcher Mut_;
  std::unique_ptr<fuzzer::Unit> CrossOverWith_;

public:
  explicit LibfuzzerMutator_t(std::mt19937_64 &Rng);

  size_t Mutate(uint8_t *Data, const size_t DataLen, const size_t MaxSize);
  void RegisterCustomMutator(const CustomMutatorFunc_t F);
  void SetCrossOverWith(const Testcase_t &Testcase);
};

class HonggfuzzMutator_t {
  honggfuzz::dynfile_t DynFile_;
  honggfuzz::honggfuzz_t Global_;
  std::mt19937_64 &Rng_;
  honggfuzz::run_t Run_;

public:
  explicit HonggfuzzMutator_t(std::mt19937_64 &Rng);
  size_t Mutate(uint8_t *Data, const size_t DataLen, const size_t MaxSize);
  void SetCrossOverWith(const Testcase_t &Testcase);
};
语料库存储
在 wtf 中,代码覆盖率基本上是适应度函数。每个生成新代码覆盖的测试用例都会被添加到语料库中。跟踪语料库的代码基本上是一份保存在内存中的测试用例列表。
主循环从语料库中请求一个测试用例,然后由其中一个通用变异器进行变异,最终进入一个执行环境。如果测试用例生成了新的覆盖率,它就会被添加到语料库存储中——没什么花哨的。
    //
    // If the coverage size has changed, it means that this testcase
    // provided new coverage indeed.
    //

    const bool NewCoverage = Coverage_.size() > SizeBefore;
    if (NewCoverage) {

      //
      // Allocate a test that will get moved into the corpus and maybe
      // saved on disk.
      //

      Testcase_t Testcase((uint8_t *)ReceivedTestcase.data(),
                          ReceivedTestcase.size());

      //
      // Before moving the buffer into the corpus, set up cross over with
      // it.
      //

      Mutator_->SetCrossOverWith(Testcase);

      //
      // Ready to move the buffer into the corpus now.
      //

      Corpus_.SaveTestcase(Result, std::move(Testcase));
    }
  }

  // [...]

  //
  // If we get here, it means that we are ready to mutate.
  // First thing we do is to grab a seed.
  //

  const Testcase_t *Testcase = Corpus_.PickTestcase();
  if (!Testcase) {
    fmt::print("The corpus is empty, exiting\n");
    std::abort();
  }

  //
  // If the testcase is too big, abort as this should not happen.
  //

  if (Testcase->BufferSize_ > Opts_.TestcaseBufferMaxSize) {
    fmt::print(
        "The testcase buffer len is bigger than the testcase buffer max "
        "size.\n");
    std::abort();
  }

  //
  // Copy the input in a buffer we're going to mutate.
  //

  memcpy(ScratchBuffer_.data(), Testcase->Buffer_.get(),
          Testcase->BufferSize_);

  //
  // Mutate in the scratch buffer.
  //

  const size_t TestcaseBufferSize =
      Mutator_->Mutate(ScratchBuffer_.data(), Testcase->BufferSize_,
                        Opts_.TestcaseBufferMaxSize);

  //
  // Copy the testcase in its own buffer before sending it to the
  // consumer.
  //

  TestcaseContent.resize(TestcaseBufferSize);
  memcpy(TestcaseContent.data(), ScratchBuffer_.data(), TestcaseBufferSize);
检测上下文切换
因为我们正在运行整个操作系统,所以我们希望避免执行与我们目的无关的操作。如果用户正在 fuzzing ida64.exe,用户并不真正关心执行 explorer.exe 的代码。因此,我们通过 TlbControlHook 回调查找 cr3 变化,并在需要时停止执行:
void BochscpuBackend_t::TlbControlHook(/*void *Context, */ uint32_t,
                                       uint32_t What, uint64_t NewCrValue) {

  //
  // We only care about CR3 changes.
  //

  if (What != BOCHSCPU_HOOK_TLB_CR3) {
    return;
  }

  //
  // And we only care about it when the CR3 value is actually different from
  // when we started the testcase.
  //

  if (NewCrValue == InitialCr3_) {
    return;
  }

  //
  // Stop the cpu as we don't want to be context-switching.
  //

  BochsHooksDebugPrint("The cr3 register is getting changed ({:#x})\n",
                       NewCrValue);
  BochsHooksDebugPrint("Stopping cpu.\n");
  TestcaseResult_ = Cr3Change_t();
  bochscpu_cpu_stop(Cpu_);
}
调试符号
现在想象一下你在使用 wtf fuzzing 目标。你需要编写一个 fuzzer 模块,告诉 wtf 如何将测试用例传递给你的目标。为了做到这一点,你可能需要读取一些全局状态,以检索某些关键结构的偏移量。我们已经构建了内存访问工具,因此你肯定可以做到,但是你必须硬编码地址。当你正在拍摄不同快照、将 fuzzer 移植到目标软件的新版本等情况时,这会很快成为问题。
早期就已经确定这是用户的一个很大痛点,我需要一种不需要硬编码的方法来处理不需要硬编码的事情。为了解决这个问题,在 Windows 上我使用 IDebugClient / IDebugControl COM 对象,它允许以编程方式使用 dbghelp 和 dbgeng 功能。你可以加载崩溃转储、评估和解析符号等。这就是 Debugger_t 类所做的事情。
轨迹生成
对我来说,最烦人的事情是执行后端非常不透明。很难看到其中发生了什么。实际上,如果你曾经尝试过使用 whv/kvm API,你可能会遇到这样的情况,API 告诉你加载了一个“错误”的 CPU 状态。这可能是由于未正确配置的 MSR、奇怪的段描述符等导致的。找出问题来自哪里既痛苦又令人沮丧。
当客户机在后端内部发生错误检查时,不知道发生了什么也很烦人。为了解决透明度的缺乏,我决定生成可用于调试的执行流跟踪。虽然非常基础,但非常有用,它可以验证后端内部的执行是否正确。除了这个工具之外,你也可以随时修改你的模块,添加战略性的断点,并在需要时转储寄存器。这些跟踪非常酷,因为你可以跟踪系统中发生的一切:从用户模式到内核模式,页故障处理程序等。
这些跟踪还用于在 lighthouse 中加载,以分析特定测试用例生成的覆盖率。
崩溃检测
我需要的最后一个基本块是用户模式崩溃检测。我之前在用户异常处理程序方面做过一些 工作,所以我了解一些它的运作方式。我决定 hook ntdll!RtlDispatchException 和 nt!KiRaiseSecurityCheckFailure 来检测可以由栈 Cookie 检查失败触发的快速失败异常。
驾驭 IDA:赤脚走进沙漠
在完成了基本功能的编写后,我开始对 IDA 进行测试。我知道我想要以加载器插件为目标,根据它们的大小以及过去的漏洞,我觉得查看 ELF 是我最好的选择。
最初,我使用 IDA 的 GUI 来进行反汇编工作。回想起来,这很疯狂,因为我记得处理了很多与 Qt 和 win32k 相关的奇怪问题。经过几周的努力,我意识到 IDA 有一些选项可以让我的生活更轻松:
IDA_NO_HISTORY=1表示我不必处理太多的注册表访问,-B选项允许从命令行中以批量模式运行 IDA,TVHEADLESS=1在处理 GUI/Qt 方面有很大帮助。
今年晚些时候,Igor 在这篇博客文章中记录了其中一些选项:Igor 的每周贴士#08:批处理模式的内幕。
插入测试用例
在了解了这些后,我立即感到可以重新利用 IDA 了。我遇到的主要问题是 IDA 通过 fread、fseek 等方法延迟加载输入文件。它还读取了许多其他文件,如配置文件、许可证文件等等。
为了能够提供我的测试用例,我实现了一层钩子,允许我将来自客户机的文件 I/O 传输到主机。这使我能够读取 IDA 许可证密钥、配置文件以及输入。这也意味着我可以忽略写入到 .id0、.id1、.nam 和所有我不关心的 IDA 生成文件中的文件写入操作。这份工作量很大,也不是很有趣。
我不是很喜欢这个传输层,因为我担心代码中的错误可能意味着在覆盖主机上的文件或导致类似的问题。这就是为什么我决定通过从内存缓冲区中读取来替换这个传输层。在启动时,wtf 将实际文件读入缓冲区,文件系统钩子按需传输字节。你可以在 fshooks.cc 中看到这个工作。
以下是该传输层允许我执行操作的示例:
bool Ida64ConfigureFsHandleTable(const fs::path &GuestFilesPath) {

  //
  // Those files are files we want to redirect to host files. When there is
  // a hooked i/o targeted to one of them, we deliver the i/o on the host
  // by calling the appropriate syscalls and proxy back the result to the
  // guest.
  //

  const std::vector<std::u16string> GuestFiles = {
      uR"(\??\C:\Program Files\IDA Pro 7.5\ida.key)",
      uR"(\??\C:\Program Files\IDA Pro 7.5\cfg\ida.cfg)",
      uR"(\??\C:\Program Files\IDA Pro 7.5\cfg\noret.cfg)",
      uR"(\??\C:\Program Files\IDA Pro 7.5\cfg\pe.cfg)",
      uR"(\??\C:\Program Files\IDA Pro 7.5\plugins\plugins.cfg)"};

  for (const auto &GuestFile : GuestFiles) {
    const size_t LastSlash = GuestFile.find_last_of(uR"(\)");
    if (LastSlash == GuestFile.npos) {
      fmt::print("Expected a / in {}\n", u16stringToString(GuestFile));
      return false;
    }

    const std::u16string GuestFilename = GuestFile.substr(LastSlash + 1);
    const fs::path HostFile(GuestFilesPath / GuestFilename);

    size_t BufferSize = 0;
    const auto Buffer = ReadFile(HostFile, BufferSize);
    if (Buffer == nullptr || BufferSize == 0) {
      fmt::print("Expected to find {}.\n", HostFile.string());
      return false;
    }

    g_FsHandleTable.MapExistingGuestFile(GuestFile.c_str(), Buffer.get(),
                                         BufferSize);
  }

  g_FsHandleTable.MapExistingWriteableGuestFile(
      uR"(\??\C:\Users\over\Desktop\wtf_input.id0)");
  g_FsHandleTable.MapNonExistingGuestFile(
      uR"(\??\C:\Users\over\Desktop\wtf_input.id1)");
  g_FsHandleTable.MapNonExistingGuestFile(
      uR"(\??\C:\Users\over\Desktop\wtf_input.nam)");
  g_FsHandleTable.MapNonExistingGuestFile(
      uR"(\??\C:\Users\over\Desktop\wtf_input.id2)");

  //
  // Those files are files we want to pretend that they don't exist in the
  // guest.
  //

  const std::vector<std::u16string> NotFounds = {
      uR"(\??\C:\Program Files\IDA Pro 7.5\ida64.int)",
      uR"(\??\C:\Program Files\IDA Pro 7.5\ids\idsnames)",
      uR"(\??\C:\Program Files\IDA Pro 7.5\ids\epoc.zip)",
      uR"(\??\C:\Program Files\IDA Pro 7.5\ids\epoc6.zip)",
      uR"(\??\C:\Program Files\IDA Pro 7.5\ids\epoc9.zip)",
      uR"(\??\C:\Program Files\IDA Pro 7.5\ids\flirt.zip)",
      uR"(\??\C:\Program Files\IDA Pro 7.5\ids\geos.zip)",
      uR"(\??\C:\Program Files\IDA Pro 7.5\ids\linux.zip)",
      uR"(\??\C:\Program Files\IDA Pro 7.5\ids\os2.zip)",
      uR"(\??\C:\Program Files\IDA Pro 7.5\ids\win.zip)",
      uR"(\??\C:\Program Files\IDA Pro 7.5\ids\win7.zip)",
      uR"(\??\C:\Program Files\IDA Pro 7.5\ids\wince.zip)",
      uR"(\??\C:\Program Files\IDA Pro 7.5\loaders\hppacore.idc)",
      uR"(\??\C:\Users\over\AppData\Roaming\Hex-Rays\IDA Pro\proccache64.lst)",
      uR"(\??\C:\Program Files\IDA Pro 7.5\cfg\Latin_1.clt)",
      uR"(\??\C:\Program Files\IDA Pro 7.5\cfg\dwarf.cfg)",
      uR"(\??\C:\Program Files\IDA Pro 7.5\ids\)",
      uR"(\??\C:\Program Files\IDA Pro 7.5\cfg\atrap.cfg)",
      uR"(\??\C:\Program Files\IDA Pro 7.5\cfg\hpux.cfg)",
      uR"(\??\C:\Program Files\IDA Pro 7.5\cfg\i960.cfg)",
      uR"(\??\C:\Program Files\IDA Pro 7.5\cfg\goodname.cfg)"};

  for (const std::u16string &NotFound : NotFounds) {
    g_FsHandleTable.MapNonExistingGuestFile(NotFound.c_str());
  }

  g_FsHandleTable.SetBlacklistDecisionHandler([](const std::u16string &Path) {
    // \ids\pc\api-ms-win-core-profile-l1-1-0.idt
    // \ids\api-ms-win-core-profile-l1-1-0.idt
    // \sig\pc\vc64seh.sig
    // \til\pc\gnulnx_x64.til
    // 6ba8075c8f243566350f741c7d6e9318089add.debug
    const bool IsIdt = Path.ends_with(u".idt");
    const bool IsIds = Path.ends_with(u".ids");
    const bool IsSig = Path.ends_with(u".sig");
    const bool IsTil = Path.ends_with(u".til");
    const bool IsDebug = Path.ends_with(u".debug");
    const bool Blacklisted = IsIdt || IsIds || IsSig || IsTil || IsDebug;

    if (Blacklisted) {
      return true;
    }

    //
    // The parser can invoke ida64!import_module to have the user select
    // a file that gets imported by the binary currently analyzed. This is
    // fine if the import directory is well formated, when it's not it
    // potentially uses garbage in the file as a path name. Strategy here
    // is to block the access if the path is not ASCII.
    //

    for (const auto &C : Path) {
      if (isascii(C)) {
        continue;
      }

      DebugPrint("Blocking a weird NtOpenFile: {}\n", u16stringToString(Path));
      return true;
    }

    return false;
  });

  return true;
}
虽然这可能是最恼人的问题,但我还必须处理更多的问题。我决定向你介绍其中一些问题。
问题一:预加载 DLL
IDA 为了知道该使用哪个加载器,会加载所有的加载器并询问它们是否知道这个文件是什么。请记住,在运行 wtf 时没有磁盘,因此加载 DLL 是一个问题。
这个问题通过在生成快照之前使用 inject 将 DLL 注入到 IDA 中来解决,这样当它加载它们时就不会生成文件 I/O。延迟加载的 DLL 也会遇到同样的问题。
问题二:页换出的内存
在 Windows 上,内存可以被交换出并写入到 pagefile.sys 文件中。当某人访问已经被分页的内存时,访问会触发 #PF,页错误处理程序通过从 pagefile 中重新加载页来解决它。但是,这又会生成文件 I/O。
我使用 lockmem 解决了用户模式下的这个问题,lockmem 是一个小型实用程序,将所有虚拟内存范围锁定到进程工作集中。以下是我用于快照 IDA 的脚本示例,它强调了我如何是同时使用 inject 和 lockmem 的:
set BASE_DIR=C:\Program Files\IDA Pro 7.5
set PLUGINS_DIR=%BASE_DIR%\plugins
set LOADERS_DIR=%BASE_DIR%\loaders
set PROCS_DIR=%BASE_DIR%\procs
set NTSD=C:\Users\over\Desktop\x64\ntsd.exe

REM Remove a bunch of plugins
del "%PLUGINS_DIR%\python.dll"
del "%PLUGINS_DIR%\python64.dll"
[...]
REM Turning on PH
REM 02000000 Enable page heap (full page heap)
reg.exe add "HKLM\SOFTWARE\Microsoft\Windows NT\CurrentVersion\Image File Execution Options\ida64.exe" /v "GlobalFlag" /t REG_SZ /d "0x2000000" /f
REM This is useful to disable stack-traces
reg.exe add "HKLM\SOFTWARE\Microsoft\Windows NT\CurrentVersion\Image File Execution Options\ida64.exe" /v "PageHeapFlags" /t REG_SZ /d "0x0" /f

REM History is stored in the registry and so triggers cr3 change (when attaching to Registry process VA)
set IDA_NO_HISTORY=1
REM Set up headless mode and run IDA
set TVHEADLESS=1
REM https://www.hex-rays.com/products/ida/support/idadoc/417.shtml
start /b %NTSD% -d "%BASE_DIR%\ida64.exe" -B wtf_input

REM bp ida64!init_database
REM Bump suspend count: ~0n
REM Detach: qd
REM Find process, set ba e1 on address from kdbg
REM ntsd -pn ida64.exe ; fix suspend count: ~0m
REM should break.

REM Inject the dlls.
inject.exe ida64.exe "%PLUGINS_DIR%"
inject.exe ida64.exe "%LOADERS_DIR%"
inject.exe ida64.exe "%PROCS_DIR%"
inject.exe ida64.exe "%BASE_DIR%\libdwarf.dll"

REM Lock everything
lockmem.exe ida64.exe

REM You can now reattach; and ~0m to bump down the suspend count
%NTSD% -pn ida64.exe
问题三:手动处理 hook 中的内存软缺页错误
为了将测试用例插入到内存中,我使用了上面描述的文件系统钩子层以及我们之前讨论过的虚拟内存设施。有时,调用者会分配一个内存缓冲区并调用 fread 将文件读入缓冲区。当调用 fread 时,我的钩子会触发,有时调用 VirtWrite 会失败。经过调试并检查 PTE 的状态,很明显 PTE 处于无效状态。这是因为 Windows 上的内存是延迟加载的。(正常情况下)期望触发页错误处理程序,它会自行修复PTE,然后继续执行。但由于我们自己在进行内存写入,这意味着不会生成页错误,因此不会调用页错误处理程序。
为了解决这个问题,我尝试进行虚拟到物理的转换并检查结果。如果转换成功,这意味着页表处于良好状态,我可以执行内存访问。如果不成功,我会在客户机中插入一个页错误并恢复执行。当执行重新开始时,页错误处理程序预计会被调用,它会修复 PTE,并将执行返回到页错误之前正在执行的指令。因为我们的钩子在那里,会第二次重新调用,不过这次从虚拟到物理的转换是有效的,我们可以进行内存写入。以下是在 ntdll!NtQueryAttributesFile 中的一个例子:
if (!g_Backend->SetBreakpoint(
        "ntdll!NtQueryAttributesFile", [](Backend_t *Backend) {
          // NTSTATUS NtQueryAttributesFile(
          //  _In_  POBJECT_ATTRIBUTES      ObjectAttributes,
          //  _Out_ PFILE_BASIC_INFORMATION FileInformation
          //);
          // ...
          //
          // Ensure that the GuestFileInformation is faulted-in memory.
          //

          if (GuestFileInformation &&
              Backend->PageFaultsMemoryIfNeeded(
                  GuestFileInformation, sizeof(FILE_BASIC_INFORMATION))) {
            return;
          }
问题四:KVA shadow
当我对 IDA 进行快照时,CPU 处于用户模式,但我设置的一些断点位于内核模式下的函数。为了能够在这些函数上设置断点,wtf 简单执行了 VirtTranslate,使用 int3 修改物理内存。这正是 KVA Shadow 所阻止的:用户 @cr3 不包含描述内核模式的页表部分(只有一些存根),因此没有有效的转换。
为了解决这个问题,我在注册表中做出以下编辑,禁用了 KVA shadow:
REM To disable mitigations for CVE-2017-5715 (Spectre Variant 2) and CVE-2017-5754 (Meltdown)
REM https://support.microsoft.com/en-us/help/4072698/windows-server-speculative-execution-side-channel-vulnerabilities
reg add "HKEY_LOCAL_MACHINE\SYSTEM\CurrentControlSet\Control\Session Manager\Memory Management" /v FeatureSettingsOverride /t REG_DWORD /d 3 /f
reg add "HKEY_LOCAL_MACHINE\SYSTEM\CurrentControlSet\Control\Session Manager\Memory Management" /v FeatureSettingsOverrideMask /t REG_DWORD /d 3 /f
问题五:确认瓶颈问题
在开发 wtf 时,我花了一些时间使用现在免费的 Intel V-Tune Profiler 对特定工作负载下的工具进行性能分析。如果你从未使用过它,你真的应该使用它,因为它既非常有趣又非常有用。如果你关心性能,你需要测量以更好地了解你可以产生最大影响的地方。不进行测量是一个很大的错误,因为你很可能会花费时间去更改可能根本不重要的代码。如果你尝试优化某些东西,你还应该能够测量你的更改的影响。
例如,以下是对下面调用的 V-Tune 热点分析报告:
wtf.exe run --name hevd --backend whv --state targets\hevd\state --runs=100000 --input targets\hevd\crashes\crash-0xfffff764b91c0000-0x0-0xffffbf84fb10e780-0x2-0x0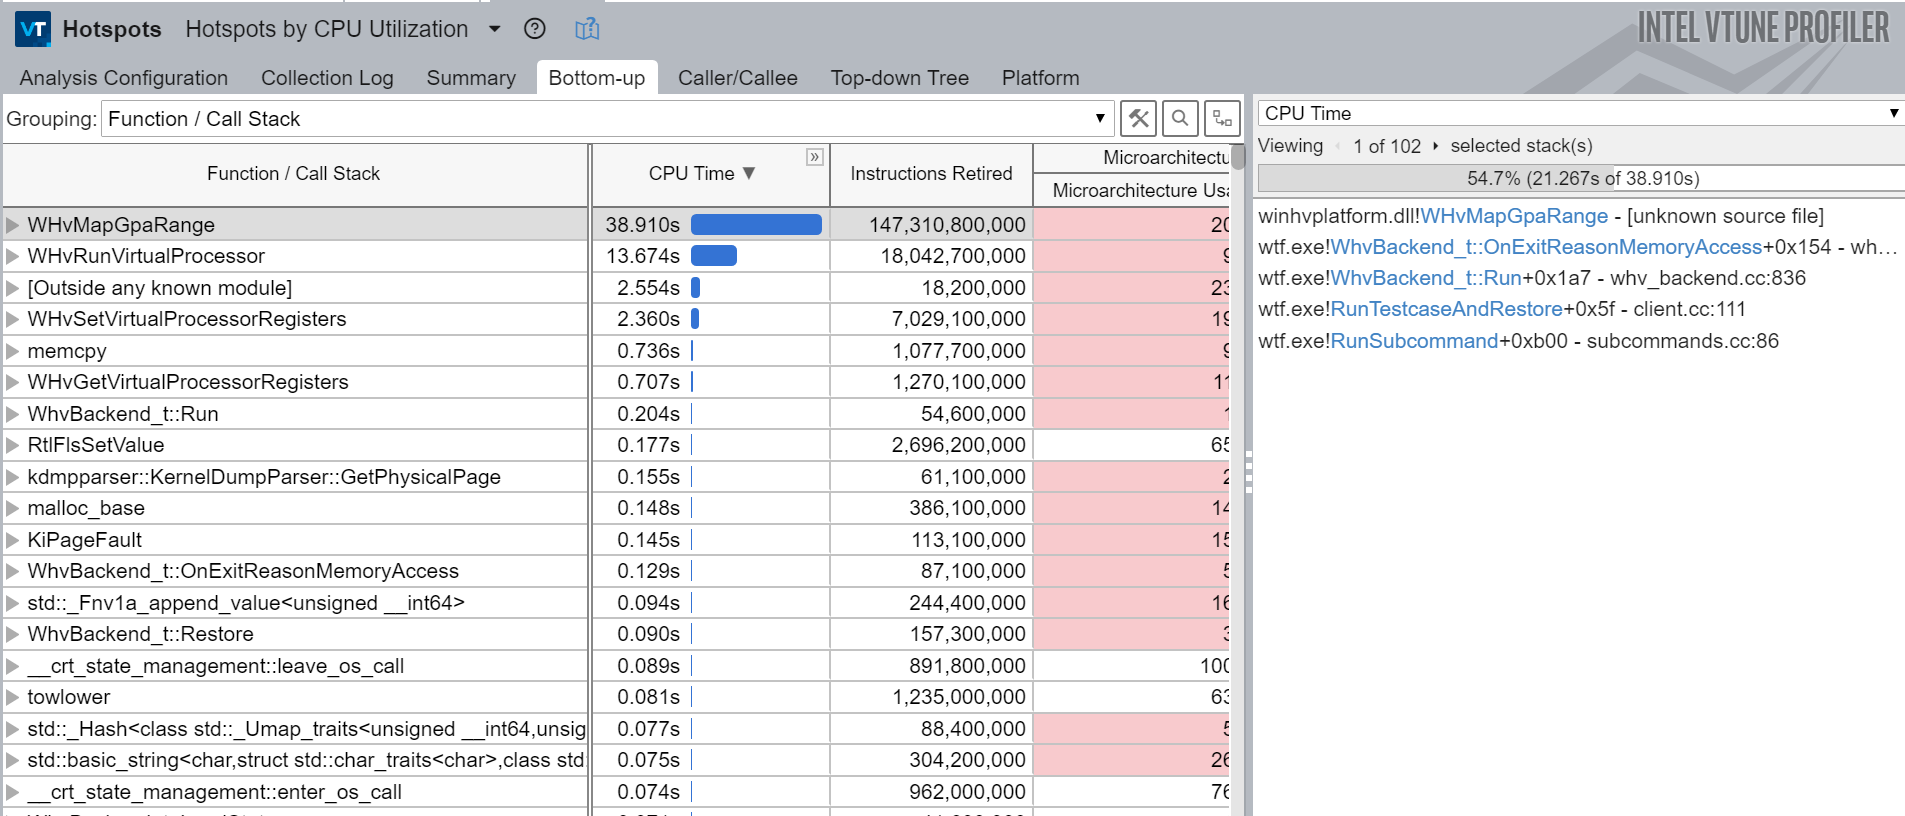
这份报告确实是灾难性的,因为它意味着我们处理内存访问错误的时间是运行目标代码的两倍。处理内存访问错误应该只需要很少的时间。如果有人熟悉 whv 和性能方面的方法,请联系我,因为我真的不知道为什么它会这么慢。
希望的诞生
经过大量的工作,我终于能够执行 ELF 加载器从开始到结束,并看到输出窗口中你将看到的消息。在下面的截图中,你可以看到 IDA 加载了 elf64.dll 加载器,然后初始化数据库和 btree。接着,它加载处理模块,创建段,处理重定位,并最终加载 dwarf 模块以解析调试信息。
>wtf.exe run --name ida64-elf75 --backend whv --state state --input ntfs-3g
Initializing the debugger instance.. (this takes a bit of time)
Parsing coverage\dwarf64.cov..
Parsing coverage\elf64.cov..
Parsing coverage\libdwarf.cov..
Applied 43624 code coverage breakpoints
[...]
Running ntfs-3g
[...]
ida64: kernelbase!LoadLibraryA(C:\Program Files\IDA Pro 7.5\loaders\elf64.dll)
ida64: ida64!msg(format="Possible file format: %s (%s) ", ...)
ida64: ELF64 for x86-64 (Shared object) - ELF64 for x86-64 (Shared object)
[...]
ida64: ida64!msg(format="   bytes   pages size description --------- ----- ---- -------------------------------------------- %9lu %5u %4u allocating memory for b-tree... ", ...)
ida64: ida64!msg(format="%9u %5u %4u allocating memory for virtual array... ", ...)
ida64: ida64!msg(format="%9u %5u %4u allocating memory for name pointers... ----------------------------------------------------------------- %9u
total memory allocated  ", ...)
ida64: kernelbase!LoadLibraryA(C:\Program Files\IDA Pro 7.5\procs\78k064.dll)
ida64: kernelbase!LoadLibraryA(C:\Program Files\IDA Pro 7.5\procs\78k0s64.dll)
ida64: kernelbase!LoadLibraryA(C:\Program Files\IDA Pro 7.5\procs\ad218x64.dll)
ida64: kernelbase!LoadLibraryA(C:\Program Files\IDA Pro 7.5\procs\alpha64.dll)
[...]
ida64: ida64!msg(format="Loading file '%s' into database... Detected file format: %s ", ...)
ida64: ida64!msg(format="Loading processor module %s for %s...", ...)
ida64: ida64!msg(format="Initializing processor module %s...", ...)
ida64: ida64!msg(format="OK ", ...)
ida64: ida64!mbox(format="@0:1139[] Can't use BIOS comments base.", ...)
ida64: ida64!msg(format="%s -> %s ", ...)
ida64: ida64!msg(format="Autoanalysis subsystem has been initialized. ", ...)
ida64: ida64!msg(format="%3d. Creating a new segment  (%08a-%08a) ...", ...)
ida64: ida64!msg(format=" ... OK ", ...)
ida64: ida64!msg(format="%3d. Creating a new segment  (%08a-%08a) ...", ...)
ida64: ida64!msg(format=" ... OK ", ...)
ida64: ida64!msg(format="%s -> %s ", ...)
[...]
ida64: ida64!msg(format="%3d. Creating a new segment  (%08a-%08a) ...", ...)
ida64: ida64!msg(format=" ... OK ", ...)
ida64: ida64!msg(format="%3d. Creating a new segment  (%08a-%08a) ...", ...)
ida64: ida64!msg(format=" ... OK ", ...)
ida64: ida64!msg(format="%3d. Creating a new segment  (%08a-%08a) ...", ...)
ida64: ida64!msg(format=" ... OK ", ...)
ida64: ida64!msg(format="%3d. Creating a new segment  (%08a-%08a) ...", ...)
ida64: ida64!msg(format=" ... OK ", ...)
ida64: ida64!msg(format="%3d. Creating a new segment  (%08a-%08a) ...", ...)
ida64: ida64!msg(format=" ... OK ", ...)
ida64: ida64!mbox(format="Reading symbols", ...)
ida64: ida64!msg(format="%3d. Creating a new segment  (%08a-%08a) ...", ...)
ida64: ida64!msg(format=" ... OK ", ...)
ida64: ida64!mbox(format="Loading symbols", ...)
ida64: ida64!msg(format="%3d. Creating a new segment  (%08a-%08a) ...", ...)
ida64: ida64!msg(format=" ... OK ", ...)
ida64: ida64!mbox(format="", ...)
ida64: ida64!msg(format="Processing relocations... ", ...)
ida64: ida64!msg(format="%a: could not patch the PLT stub; unexpected PLT format or the file has been modified after linking! ", ...)
ida64: ida64!mbox(format="Unexpected entries in the PLT stub. The file might have been modified after linking.", ...)
ida64: ida64!msg(format="%s -> %s ", ...)
ida64: Unexpected entries in the PLT stub.
The file might have been modified after linking.
ida64: ida64!msg(format="%a: could not patch the PLT stub; unexpected PLT format or the file has been modified after linking! ", ...)
[...]
ida64: ida64!msg(format="%a: could not patch the PLT stub; unexpected PLT format or the file has been modified after linking! ", ...)
ida64: ida64!msg(format="%a: could not patch the PLT stub; unexpected PLT format or the file has been modified after linking! ", ...)
ida64: ida64!msg(format="%a: could not patch the PLT stub; unexpected PLT format or the file has been modified after linking! ", ...)
ida64: ida64!msg(format="%a: could not patch the PLT stub; unexpected PLT format or the file has been modified after linking! ", ...)
ida64: kernelbase!LoadLibraryA(C:\Program Files\IDA Pro 7.5\plugins\dbg64.dll)
ida64: kernelbase!LoadLibraryA(C:\Program Files\IDA Pro 7.5\plugins\dwarf64.dll)
ida64: kernelbase!LoadLibraryA(C:\Program Files\IDA Pro 7.5\libdwarf.dll)
ida64: ida64!msg(format="%s", ...)
ida64: ida64!msg(format="no. ", ...)
ida64: ida64!msg(format="%s", ...)
ida64: ida64!msg(format="no. ", ...)
ida64: ida64!msg(format="Plugin "%s" not found ", ...)
ida64: Hit the end of load file :o
whv 后端:极品飞车
在这个阶段,我能够 fuzzing IDA,但速度非常慢,每秒只能执行大约 0.01 个测试用例。看到它工作、发现新的代码覆盖等等都非常酷,但我觉得在这个速度下我不会发现太多东西。这就是为什么我决定考虑使用 whv 来实现一个执行后端。
我之前用过 pywinhv 玩过 whv,所以我很熟悉 API 提供的功能。由于这是第一个使用虚拟化的执行后端,我不得不重新思考一些基本原则。
代码覆盖率
我采用了在基本块开头使用一次性软断点的方法。用户只需生成包含断点地址列表的 JSON 文件,wtf 在初始化时使用该文件。这意味着用户可以选择性地为它想要覆盖的模块进行覆盖。
但是这种方法很麻烦,因为它意味着你需要将这些模块放入 IDA 中,并为每个模块生成 JSON 文件。我用的脚本在此处可用:gen_coveragefile_ida.py。当然,你也可以通过其他工具生成该文件。
总体而言,我认为这是一个好的权衡。我尝试过更具创意和奇特的方式来获取代码覆盖率。例如使用 int3 来填充地址空间,并采用长度分析引擎来延迟填充代码,以了解指令的大小等。我很喜欢这个想法,但是我在包含数据的代码段中遇到了大量的 switch 表问题。这意味着当设置软断点时,wtf 会破坏它们,导致系统中出现大量异常崩溃,因此我放弃了这个想法。Trap 标志非常慢,并且 whv 没有暴露 Monitor Trap 标志位。
对我来说,理想的情况是找到一种保持性能并在不知道目标信息的情况下获取代码覆盖率的方法,就像在 bochscpu 中一样。
脏内存
我需要的另一件事是能够跟踪脏内存。 whv 提供了 WHvQueryGpaRangeDirtyBitmap 来做到这一点,这很完美。
路径跟踪
我曾经希望能够像在 bochscpu 中一样生成执行跟踪。最初我以为我能够使用 Trap 标志来模拟这种功能。如果你打开 Trap 标志,比如在 syscall 指令上,故障会在指令执行后触发,这样你就会错过整个内核侧的执行。我发现这是由于 syscall 的实现导致的:它使用 IA32_FMASK MSR 屏蔽 RFLAGS,去除 Trap 标志。在我自己编写 IA32_FMASK 后,就可以跟踪 syscall 了,这非常棒。通过比较两个后端生成的跟踪,我注意到 whv 跟踪缺少页错误。这基本上是同一个问题的另一个实例:当发生中断时,CPU 保存当前上下文并从任务段加载新的上下文,该上下文没有 Trap 标志。我不记得我是否解决了这个问题,或者这是否比看起来更难,但最终我回滚了代码,并只选择生成代码覆盖跟踪。这绝对是我未来想要重新审视的事情。
超时
为了避免 fuzzer 受到无限循环的影响,并限制执行时间,我使用了定时器告诉虚拟处理器停止执行。这不像 bochscpu 提供的那样精确,但这是我能想到的唯一解决方案:
class TimerQ_t {
  HANDLE TimerQueue_ = nullptr;
  HANDLE LastTimer_ = nullptr;

  static void CALLBACK AlarmHandler(PVOID, BOOLEAN) {
    reinterpret_cast<WhvBackend_t *>(g_Backend)->CancelRunVirtualProcessor();
  }

public:
  ~TimerQ_t() {
    if (TimerQueue_) {
      DeleteTimerQueueEx(TimerQueue_, nullptr);
    }
  }

  TimerQ_t() = default;
  TimerQ_t(const TimerQ_t &) = delete;
  TimerQ_t &operator=(const TimerQ_t &) = delete;

  void SetTimer(const uint32_t Seconds) {
    if (Seconds == 0) {
      return;
    }

    if (!TimerQueue_) {
      TimerQueue_ = CreateTimerQueue();
      if (!TimerQueue_) {
        fmt::print("CreateTimerQueue failed.\n");
        exit(1);
      }
    }

    if (!CreateTimerQueueTimer(&LastTimer_, TimerQueue_, AlarmHandler,
                                nullptr, Seconds * 1000, Seconds * 1000, 0)) {
      fmt::print("CreateTimerQueueTimer failed.\n");
      exit(1);
    }
  }

  void TerminateLastTimer() {
    DeleteTimerQueueTimer(TimerQueue_, LastTimer_, nullptr);
  }
};
插入页错误
为了能够在宿主机中插入页错误,我使用 WHvRegisterPendingEvent 寄存器和 WHvX64PendingEventException 事件类型:
bool WhvBackend_t::PageFaultsMemoryIfNeeded(const Gva_t Gva,
                                            const uint64_t Size) {
  const Gva_t PageToFault = GetFirstVirtualPageToFault(Gva, Size);

  //
  // If we haven't found any GVA to fault-in then we have no job to do so we
  // return.
  //

  if (PageToFault == Gva_t(0xffffffffffffffff)) {
    return false;
  }

  WhvDebugPrint("Inserting page fault for GVA {:#x}\n", PageToFault);

  // cf 'VM-Entry Controls for Event Injection' in Intel 3C
  WHV_REGISTER_VALUE_t Exception;
  Exception->ExceptionEvent.EventPending = 1;
  Exception->ExceptionEvent.EventType = WHvX64PendingEventException;
  Exception->ExceptionEvent.DeliverErrorCode = 1;
  Exception->ExceptionEvent.Vector = WHvX64ExceptionTypePageFault;
  Exception->ExceptionEvent.ErrorCode = ErrorWrite | ErrorUser;
  Exception->ExceptionEvent.ExceptionParameter = PageToFault.U64();

  if (FAILED(SetRegister(WHvRegisterPendingEvent, &Exception))) {
    __debugbreak();
  }

  return true;
}
确定性
我想要的最后一个特性是尽可能获得确定性。在跟踪了大量执行后,我意识到 Windows 内核中使用 rdrand 的 nt!ExGenRandom 是执行中非确定性的主要来源。Intel 支持在调用该指令时生成 vmexit,但是这也没有在 whv 中公开。
因此,我选择在该函数上设置断点,并使用确定性实现来模拟其行为。
//
// Make ExGenRandom deterministic.
//
// kd> ub fffff805`3b8287c4 l1
// nt!ExGenRandom+0xe0:
// fffff805`3b8287c0 480fc7f2        rdrand  rdx
const Gva_t ExGenRandom = Gva_t(g_Dbg.GetSymbol("nt!ExGenRandom") + 0xe4);
if (!g_Backend->SetBreakpoint(ExGenRandom, [](Backend_t *Backend) {
      DebugPrint("Hit ExGenRandom!\n");
      Backend->Rdx(Backend->Rdrand());
    })) {
  return false;
}
我不是很喜欢这个解决方案,因为它意味着你需要知道非确定性来自哪里,而通常在一开始很难弄清楚。另一个非确定性的来源是时间戳计数器。据我所知,这并没有导致任何重大问题,但这可能在未来会对我们造成影响。
实现了上述解决方案后,我能够通过后端端到端地运行测试用例,这非常好。下面我会描述一些在测试过程中解决的问题。
问题六:代码覆盖断点开销不小
在分析 wtf 时我发现我认为是“免费”的代码覆盖断点实际上并不完全是免费的。理论上它们是一次性断点,因此你只需要支付一次执行它们的成本。这导致在运行开始时你需要支付一个预热成本,因为 fuzzer 正在发现高度可达的代码段。但是,如果在一段时间后看它,它应该不会带来任何开销。
我实现中的问题在于执行测试用例后用于恢复这些断点的代码。我跟踪了列表中未命中的代码覆盖断点。恢复时,我会首先恢复每个脏页,并遍历该列表以重置代码覆盖断点。事实证明,当存在数十万个断点时,这样的效率非常低。
我做了大部分人遇到性能问题时通常所做的事情:用 CPU 时间换内存。解决这个问题的答案是 Ram_t 类。它的工作方式是,每次添加代码覆盖断点时,它会复制该页并在该页以及宿主 RAM 中设置断点。
//
// Add a breakpoint to a GPA.
//

uint8_t *AddBreakpoint(const Gpa_t Gpa) {
  const Gpa_t AlignedGpa = Gpa.Align();
  uint8_t *Page = nullptr;

  //
  // Grab the page if we have it in the cache
  //

  if (Cache_.contains(Gpa.Align())) {
    Page = Cache_.at(AlignedGpa);
  }

  //
  // Or allocate and initialize one!
  //

  else {
    Page = (uint8_t *)aligned_alloc(Page::Size, Page::Size);
    if (Page == nullptr) {
      fmt::print("Failed to call aligned_alloc.\n");
      return nullptr;
    }

    const uint8_t *Virgin =
        Dmp_.GetPhysicalPage(AlignedGpa.U64()) + AlignedGpa.Offset().U64();
    if (Virgin == nullptr) {
      fmt::print(
          "The dump does not have a page backing GPA {:#x}, exiting.\n",
          AlignedGpa);
      return nullptr;
    }

    memcpy(Page, Virgin, Page::Size);
  }

  //
  // Apply the breakpoint.
  //

  const uint64_t Offset = Gpa.Offset().U64();
  Page[Offset] = 0xcc;
  Cache_.emplace(AlignedGpa, Page);

  //
  // And also update the RAM.
  //

  Ram_[Gpa.U64()] = 0xcc;
  return &Page[Offset];
}
当遇到代码覆盖断点时,该类会从这两个位置删除断点。
//
// Remove a breakpoint from a GPA.
//

void RemoveBreakpoint(const Gpa_t Gpa) {
  const uint8_t *Virgin = GetHvaFromDump(Gpa);
  uint8_t *Cache = GetHvaFromCache(Gpa);

  //
  // Update the RAM.
  //

  Ram_[Gpa.U64()] = *Virgin;

  //
  // Update the cache. We assume that an entry is available in the cache.
  //

  *Cache = *Virgin;
}
在恢复脏内存时,你只需要遍历脏页并请求 Ram_t 类恢复该页的内容。该类会检查该页是否在内部被复制,如果被复制了,它会从该复制中恢复。如果没有复制,它会从转储文件中恢复内容。这使我们能够用额外的内存成本恢复代码覆盖断点:
//
// Restore a GPA from the cache or from the dump file if no entry is
// available in the cache.
//

const uint8_t *Restore(const Gpa_t Gpa) {
  //
  // Get the HVA for the page we want to restore.
  //

  const uint8_t *SrcHva = GetHva(Gpa);

  //
  // Get the HVA for the page in RAM.
  //

  uint8_t *DstHva = Ram_ + Gpa.Align().U64();

  //
  // It is possible for a GPA to not exist in our cache and in the dump file.
  // For this to make sense, you have to remember that the crash-dump does not
  // contain the whole amount of RAM. In which case, the guest OS can decide
  // to allocate new memory backed by physical pages that were not dumped
  // because not currently used by the OS.
  //
  // When this happens, we simply zero initialize the page as.. this is
  // basically the best we can do. The hope is that if this behavior is not
  // correct, the rest of the execution simply explodes pretty fast.
  //

  if (!SrcHva) {
    memset(DstHva, 0, Page::Size);
  }

  //
  // Otherwise, this is straight forward, we restore the source into the
  // destination. If we had a copy, then that is what we are writing to the
  // destination, and if we didn't have a copy then we are restoring the
  // content from the crash-dump.
  //

  else {
    memcpy(DstHva, SrcHva, Page::Size);
  }

  //
  // Return the HVA to the user in case it needs to know about it.
  //

  return DstHva;
}
问题七:IDA 的代码覆盖率
上面提到我使用 IDA 生成 wtf 所需的代码覆盖断点列表。起初,我认为这是一种万无一失的技术,但我遇到了一个非常恼人的 bug,即 IDA 将 switch-tables 标记为代码而不是数据。这导致 wtf 用 0xcc 污染 switch-tables,从而使宿主机以惊人的方式崩溃。
我还没有在最新版本的 IDA 中遇到这个 bug,这非常不错。
问题八:优化的回合
对 fuzzer 进行性能分析后,我注意到 WHvQueryGpaRangeDirtyBitmap 由于未知原因极其缓慢。
为了解决这个问题,我最终在 EPT 中将内存映射为只读/执行,并在收到写内存错误时跟踪脏页来模拟该功能。
HRESULT
WhvBackend_t::OnExitReasonMemoryAccess(
    const WHV_RUN_VP_EXIT_CONTEXT &Exception) {
  const Gpa_t Gpa = Gpa_t(Exception.MemoryAccess.Gpa);
  const bool WriteAccess =
      Exception.MemoryAccess.AccessInfo.AccessType == WHvMemoryAccessWrite;

  if (!WriteAccess) {
    fmt::print("Dont know how to handle this fault, exiting.\n");
    __debugbreak();
    return E_FAIL;
  }

  //
  // Remap the page as writeable.
  //

  const WHV_MAP_GPA_RANGE_FLAGS Flags = WHvMapGpaRangeFlagWrite |
                                        WHvMapGpaRangeFlagRead |
                                        WHvMapGpaRangeFlagExecute;

  const Gpa_t AlignedGpa = Gpa.Align();
  DirtyGpa(AlignedGpa);

  uint8_t *AlignedHva = PhysTranslate(AlignedGpa);
  return MapGpaRange(AlignedHva, AlignedGpa, Page::Size, Flags);
}
修复后,我注意到 WHvTranslateGva 也比我预期的要慢。这就是为什么我也通过自己遍历页表来模拟它的行为:
HRESULT
WhvBackend_t::TranslateGva(const Gva_t Gva, const WHV_TRANSLATE_GVA_FLAGS,
                           WHV_TRANSLATE_GVA_RESULT &TranslationResult,
                           Gpa_t &Gpa) const {

  //
  // Stole most of the logic from @yrp604's code so thx bro.
  //

  const VIRTUAL_ADDRESS GuestAddress = Gva.U64();
  const MMPTE_HARDWARE Pml4 = GetReg64(WHvX64RegisterCr3);
  const uint64_t Pml4Base = Pml4.PageFrameNumber * Page::Size;
  const Gpa_t Pml4eGpa = Gpa_t(Pml4Base + GuestAddress.Pml4Index * 8);
  const MMPTE_HARDWARE Pml4e = PhysRead8(Pml4eGpa);
  if (!Pml4e.Present) {
    TranslationResult.ResultCode = WHvTranslateGvaResultPageNotPresent;
    return S_OK;
  }

  const uint64_t PdptBase = Pml4e.PageFrameNumber * Page::Size;
  const Gpa_t PdpteGpa = Gpa_t(PdptBase + GuestAddress.PdPtIndex * 8);
  const MMPTE_HARDWARE Pdpte = PhysRead8(PdpteGpa);
  if (!Pdpte.Present) {
    TranslationResult.ResultCode = WHvTranslateGvaResultPageNotPresent;
    return S_OK;
  }

  //
  // huge pages:
  // 7 (PS) - Page size; must be 1 (otherwise, this entry references a page
  // directory; see Table 4-1
  //

  const uint64_t PdBase = Pdpte.PageFrameNumber * Page::Size;
  if (Pdpte.LargePage) {
    TranslationResult.ResultCode = WHvTranslateGvaResultSuccess;
    Gpa = Gpa_t(PdBase + (Gva.U64() & 0x3fff'ffff));
    return S_OK;
  }

  const Gpa_t PdeGpa = Gpa_t(PdBase + GuestAddress.PdIndex * 8);
  const MMPTE_HARDWARE Pde = PhysRead8(PdeGpa);
  if (!Pde.Present) {
    TranslationResult.ResultCode = WHvTranslateGvaResultPageNotPresent;
    return S_OK;
  }

  //
  // large pages:
  // 7 (PS) - Page size; must be 1 (otherwise, this entry references a page
  // table; see Table 4-18
  //

  const uint64_t PtBase = Pde.PageFrameNumber * Page::Size;
  if (Pde.LargePage) {
    TranslationResult.ResultCode = WHvTranslateGvaResultSuccess;
    Gpa = Gpa_t(PtBase + (Gva.U64() & 0x1f'ffff));
    return S_OK;
  }

  const Gpa_t PteGpa = Gpa_t(PtBase + GuestAddress.PtIndex * 8);
  const MMPTE_HARDWARE Pte = PhysRead8(PteGpa);
  if (!Pte.Present) {
    TranslationResult.ResultCode = WHvTranslateGvaResultPageNotPresent;
    return S_OK;
  }

  TranslationResult.ResultCode = WHvTranslateGvaResultSuccess;
  const uint64_t PageBase = Pte.PageFrameNumber * 0x1000;
  Gpa = Gpa_t(PageBase + GuestAddress.Offset);
  return S_OK;
}
收取报酬
比较两个后端,whv 的性能比 bochscpu 高出大约 15 倍。老实说,我有点失望,因为我预计性能会提高 100 倍,但我想这仍然是一个显着的性能提升:
bochscpu:
#1 cov: 260546 corp: 0 exec/s: 0.1 lastcov: 0.0s crash: 0 timeout: 0 cr3: 0
#2 cov: 260546 corp: 0 exec/s: 0.1 lastcov: 12.0s crash: 0 timeout: 0 cr3: 0
#3 cov: 260546 corp: 0 exec/s: 0.1 lastcov: 25.0s crash: 0 timeout: 0 cr3: 0
#4 cov: 260546 corp: 0 exec/s: 0.1 lastcov: 38.0s crash: 0 timeout: 0 cr3: 0

whv:
#12 cov: 25521 corp: 0 exec/s: 1.5 lastcov: 6.0s crash: 0 timeout: 0 cr3: 0
#30 cov: 25521 corp: 0 exec/s: 1.5 lastcov: 16.0s crash: 0 timeout: 0 cr3: 0
#48 cov: 25521 corp: 0 exec/s: 1.5 lastcov: 27.0s crash: 0 timeout: 0 cr3: 0
#66 cov: 25521 corp: 0 exec/s: 1.5 lastcov: 37.0s crash: 0 timeout: 0 cr3: 0
#84 cov: 25521 corp: 0 exec/s: 1.5 lastcov: 47.0s crash: 0 timeout: 0 cr3: 0
速度开始好到足以让我通宵运行,并发现我的前几次崩溃,这很令人兴奋,尽管它们只是 interr。
KVM 后端:速度与激情
我非常想在合适的硬件上开始 fuzzing IDA。很明显,在云中租用启用了嵌套虚拟化的 Windows 机器并不普遍,也不便宜。除此之外,我还对 whv 的性能感到失望,因此我很想看看像 Xen 或 KVM 这样经过实战检验的虚拟化程序的表现。
我对这些 VMM 一无所知,但我很快发现 KVM 在 Linux 内核中可用,并且它通过 /dev/kvm 公开了一个类似于 whv 用户模式的 API。这看起来非常完美,因为如果它与 whv 足够相似,我可能可以轻松地为其编写后端。KVM API 支持 Firecracker,Firecracker 是一个创建微型 VM 以在云中运行各种工作负载的项目。我认为,你需要丰富的功能以及良好的性能作为该项目的基础技术。
KVM API 的工作方式与 whv 非常相似,因此我不会重复之前的部分。相反,我将向你介绍一些不同之处,并介绍我在 KVM 上更喜欢的一些东西。
通过共享内存使用通用寄存器
为了避免每次需要访问客户机通用寄存器时都发送一个 IOCTL,KVM 允许你使用内核映射共享内存区域布置寄存器:
//
// Get the size of the shared kvm run structure.
//

VpMmapSize_ = ioctl(Kvm_, KVM_GET_VCPU_MMAP_SIZE, 0);
if (VpMmapSize_ < 0) {
  perror("Could not get the size of the shared memory region.");
  return false;
}

//
// Man says:
//   there is an implicit parameter block that can be obtained by mmap()'ing
//   the vcpu fd at offset 0, with the size given by KVM_GET_VCPU_MMAP_SIZE.
//

Run_ = (struct kvm_run *)mmap(nullptr, VpMmapSize_, PROT_READ | PROT_WRITE,
                              MAP_SHARED, Vp_, 0);
if (Run_ == nullptr) {
  perror("mmap VCPU_MMAP_SIZE");
  return false;
}
按需分页
用 KVM 实现按需分页是非常容易的。它使用了 userfaultfd,因此你只需启动一个轮询的线程处理请求:
void KvmBackend_t::UffdThreadMain() {
  while (!UffdThreadStop_) {

    //
    // Set up the pool fd with the uffd fd.
    //

    struct pollfd PoolFd = {.fd = Uffd_, .events = POLLIN};

    int Res = poll(&PoolFd, 1, 6000);
    if (Res < 0) {

      //
      // Sometimes poll returns -EINTR when we are trying to kick off the CPU
      // out of KVM_RUN.
      //

      if (errno == EINTR) {
        fmt::print("Poll returned EINTR\n");
        continue;
      }

      perror("poll");
      exit(EXIT_FAILURE);
    }

    //
    // This is the timeout, so we loop around to have a chance to check for
    // UffdThreadStop_.
    //

    if (Res == 0) {
      continue;
    }

    //
    // You get the address of the access that triggered the missing page event
    // out of a struct uffd_msg that you read in the thread from the uffd. You
    // can supply as many pages as you want with UFFDIO_COPY or UFFDIO_ZEROPAGE.
    // Keep in mind that unless you used DONTWAKE then the first of any of those
    // IOCTLs wakes up the faulting thread.
    //

    struct uffd_msg UffdMsg;
    Res = read(Uffd_, &UffdMsg, sizeof(UffdMsg));
    if (Res < 0) {
      perror("read");
      exit(EXIT_FAILURE);
    }

    //
    // Let's ensure we are dealing with what we think we are dealing with.
    //

    if (Res != sizeof(UffdMsg) || UffdMsg.event != UFFD_EVENT_PAGEFAULT) {
      fmt::print("The uffdmsg or the type of event we received is unexpected, "
                 "bailing.");
      exit(EXIT_FAILURE);
    }

    //
    // Grab the HVA off the message.
    //

    const uint64_t Hva = UffdMsg.arg.pagefault.address;

    //
    // Compute the GPA from the HVA.
    //

    const Gpa_t Gpa = Gpa_t(Hva - uint64_t(Ram_.Hva()));

    //
    // Page it in.
    //

    RunStats_.UffdPages++;
    const uint8_t *Src = Ram_.GetHvaFromDump(Gpa);
    if (Src != nullptr) {
      const struct uffdio_copy UffdioCopy = {
          .dst = Hva,
          .src = uint64_t(Src),
          .len = Page::Size,
      };

      //
      // The primary ioctl to resolve userfaults is UFFDIO_COPY. That atomically
      // copies a page into the userfault registered range and wakes up the
      // blocked userfaults (unless uffdio_copy.mode & UFFDIO_COPY_MODE_DONTWAKE
      // is set). Other ioctl works similarly to UFFDIO_COPY. They’re atomic as
      // in guaranteeing that nothing can see an half copied page since it’ll
      // keep userfaulting until the copy has finished.
      //

      Res = ioctl(Uffd_, UFFDIO_COPY, &UffdioCopy);
      if (Res < 0) {
        perror("UFFDIO_COPY");
        exit(EXIT_FAILURE);
      }
    } else {
      const struct uffdio_zeropage UffdioZeroPage = {
          .range = {.start = Hva, .len = Page::Size}};

      Res = ioctl(Uffd_, UFFDIO_ZEROPAGE, &UffdioZeroPage);
      if (Res < 0) {
        perror("UFFDIO_ZEROPAGE");
        exit(EXIT_FAILURE);
      }
    }
  }
}
超时
另一个很酷的事情是,如果硬件支持,KVM 会向客户机公开性能监视器单元(PMU)。当硬件支持时,我可以编程 PMU 在执行任意数量的指令后触发中断。这非常有用,因为当 MSR_IA32_FIXED_CTR0 溢出时,它会触发一个特殊的中断,称为 PMI,通过 CPU IDT 的向量 0xE 传递。为了捕获它,我们只需在 hal!HalPerfInterrupt 上设置断点:
//
// This is to catch the PMI interrupt if performance counters are used to
// bound execution.
//

if (!g_Backend->SetBreakpoint("hal!HalpPerfInterrupt",
                              [](Backend_t *Backend) {
                                CrashDetectionPrint("Perf interrupt\n");
                                Backend->Stop(Timedout_t());
                              })) {
  fmt::print("Could not set a breakpoint on hal!HalpPerfInterrupt, but "
              "carrying on..\n");
}
为了使其正常工作,你需要对 APIC 进行一些编程,我记得我努力触发中断。我仍然不确定我是否完全正确地理解了细节,但在我的测试中,中断始终触发,所以我就到此为止了。我还想在将来重新审视这个领域,因为 fuzzer 上可能还有其他功能。
问题九:在云上运行
KVM 后端开发是在一台笔记本上通过启用了嵌套虚拟化的 Hyper-V 虚拟机完成的。它运行得非常好,但性能不够强大,因此我希望在真实硬件上运行它。经过四处寻找,我意识到亚马逊没有任何支持嵌套虚拟化的产品,只有微软的 Azure 有启用嵌套虚拟化的 SKU。我租了一台进行尝试,但该硬件不支持称为 unrestricted_guest 的 VMX 功能。我不太记得为什么它很重要,但它与实模式、APIC 以及我创建内存插槽的方式有关。我开发后端时假设这个功能会存在,因此我也没有使用 Azure。
相反,我在 vultr 上以大约 $100/月的价格租了一台裸机服务器。CPU 是 Xeon E3-1270v6处理器,4核 8 线程,主频为 3.8GHz,对我的使用来说似乎足够了。该硬件具有 PMU,我在 wtf 中也开发了对它的支持。
我非常满意,因为 fuzzer 的运行速度比 whv 快了约 10 倍。虽然这些数字不是从相同的硬件上获得的,因此不能进行公平比较,但仍然很不错:
#123 cov: 25521 corp: 0 exec/s: 12.3 lastcov: 9.0s crash: 0 timeout: 0 cr3: 0
#252 cov: 25521 corp: 0 exec/s: 12.5 lastcov: 19.0s crash: 0 timeout: 0 cr3: 0
#381 cov: 25521 corp: 0 exec/s: 12.5 lastcov: 29.0s crash: 0 timeout: 0 cr3: 0
#510 cov: 25521 corp: 0 exec/s: 12.6 lastcov: 39.0s crash: 0 timeout: 0 cr3: 0
#639 cov: 25521 corp: 0 exec/s: 12.6 lastcov: 49.0s crash: 0 timeout: 0 cr3: 0
#768 cov: 25521 corp: 0 exec/s: 12.6 lastcov: 59.0s crash: 0 timeout: 0 cr3: 0
#897 cov: 25521 corp: 0 exec/s: 12.6 lastcov: 1.1min crash: 0 timeout: 0 cr3: 0
为了提供更多细节,该测试用例执行了约 1.95 亿条指令,统计结果如下(由 bochscpu 生成):
Run stats:
Instructions executed: 194593453 (260546 unique)
          Dirty pages: 9166848 bytes (0 MB)
      Memory accesses: 411196757 bytes (24 MB)
问题十:简化 610 万个语料库
在编写 wtf 的同时,我获得了一个由最奇怪的 ELF 组成的庞大语料库。我建立了这个由 160 万个 ELF 文件组成的语料库,现在需要对其进行简化。根据我构建 wtf 的方式,简化是一个串行的过程。我本可以采用 AFL 方法生成最终合并在一起的执行跟踪,但我也不喜欢这个主意。
相反,我将 wtf 重新构建为客户端和服务端。服务端拥有覆盖率、语料库和变异器。它只是将测试用例分发给客户端,并从客户端接收代码覆盖率报告。你可以看到客户端是发送结果到服务器的运行器。所有重要的状态都保存在服务器中。
这种模型很好,因为它的自动化意味着我可以充分利用我租用的硬件来简化这些文件。例如,使用单核心对这个文件语料库进行简化可能需要数周才能完成,但使用这种新架构只需要8小时:
#1972714 cov: 74065 corp: 3176 (58mb) exec/s: 64.2 (8 nodes) lastcov: 3.0s crash: 49 timeout: 71 cr3: 48 uptime: 8hr
总结
在本文中,我们回顾了 wtf 的诞生,这是一个分布式、代码覆盖引导、可定制、跨平台的基于快照的 fuzzer,旨在攻击运行在 Microsoft Windows 上的用户和/或内核模式目标。它还促成了许多其他小型项目的编写和开源:lockmem、inject、kdmp-parser 和 symbolizer。
我们从零开始,在各种 IDA 组件中发现了数十个独特的崩溃:libdwarf64.dll、dwarf64.dll、elf64.dll 和 pdb64.dll。发现的问题多种多样:空指针引用、堆栈溢出、除零错误、无限循环、UAF 和越界访问。我已经将所有的发现编译在以下的 Github 存储库中:fuzzing-ida75。
我可能进行了整整一个月的 fuzzing,但大部分崩溃在前两周就出现了。根据 lighthouse 的统计,我成功覆盖了大约 80% 的 elf64.dll、50% 的 dwarf64.dll 和 26% 的 libdwarf64.dll,使用大约 2.4k 个最小文件集,总共 17MB。
在结束之前,我想感谢 IDA Hex-Rays 团队以惊人的速度处理并修复我的报告。我强烈建议你尝试他们的赏金计划,因为我相信还有很多可以发现的漏洞。